English


How to Fray Edges of Fabric: Methods for Woven Fabric
Content
- 1 How to Fray Edges of Fabric: The Direct Answer
- 2 Understanding Woven Fabric Structure Before You Start
- 3 Tools You Need to Fray Fabric Edges Effectively
- 4 Step-by-Step Methods for Fraying Woven Fabric
- 5 Best Fabrics for Fraying: A Practical Comparison
- 6 How to Control Fraying Depth and Prevent Over-Fraying
- 7 Creative Applications: Where Frayed Edges Work Best
- 8 Common Mistakes When Fraying Woven Fabric (and How to Fix Them)
- 9 Caring for Frayed Woven Fabric After the Project Is Finished
- 10 Fraying vs. Other Edge Finishing Techniques: When Fraying Is and Is Not the Right Choice
- 11 Tips for Getting Professional-Looking Frayed Edges Every Time
How to Fray Edges of Fabric: The Direct Answer
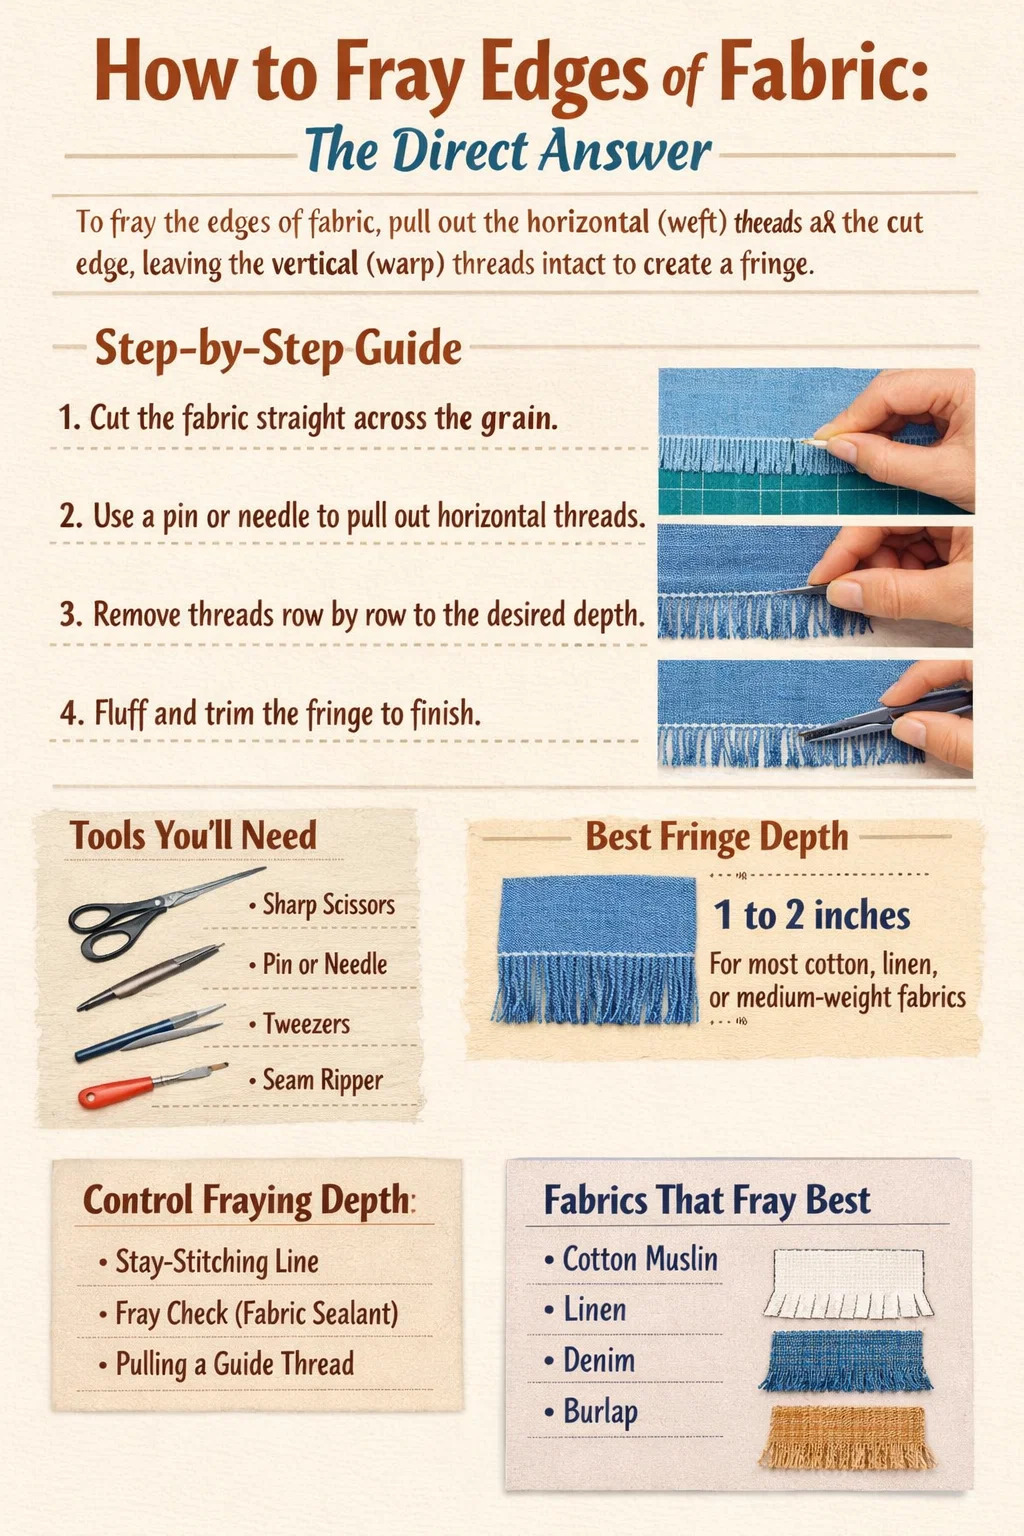
To fray the edges of fabric, you pull out the horizontal (weft) threads along the cut edge of a woven fabric, leaving the vertical (warp) threads intact and loose. This creates the characteristic fringe or frayed look. The most reliable method is to make a straight cut, then use a pin or needle to loosen and pull out threads one by one from the edge, working row by row until you reach your desired fringe depth. For most medium-weight woven fabrics like cotton or linen, pulling out threads to a depth of 1 to 2 inches creates a full, attractive fringe without compromising the structural integrity of the piece.
This technique works specifically because of how woven fabric is constructed — interlaced warp and weft threads that can be separated when the weave structure is exposed at a cut edge. Knits, felts, and non-wovens do not fray in the same way and are not suitable for this technique.
Understanding Woven Fabric Structure Before You Start
Before attempting to fray any fabric, it helps enormously to understand what makes woven fabric frayable in the first place. Woven fabric is produced on a loom by interlacing two sets of threads at right angles to each other. The lengthwise threads are called the warp, and the crosswise threads are called the weft. These two thread systems hold each other in place through tension and interlacing — but only as long as the weave is uninterrupted.
When you cut across the weft threads, you sever them at the edge. Those cut weft threads are no longer held in place by the selvedge or by further weaving, so they can be pulled out individually. The warp threads, running the length of the fabric, remain anchored by the body of the fabric and stand free once the weft is removed — creating fringe.
This is why the direction of your cut matters significantly. Cutting parallel to the selvage (along the grain) exposes weft threads for pulling. Cutting perpendicular exposes warp threads instead. Both can be frayed, but the resulting fringe will differ in texture and drape depending on which thread system is left standing.
Weave Types and How They Affect Fraying
Not all woven fabrics fray with equal ease. The weave structure plays a major role:
- Plain weave (muslin, cotton broadcloth, linen): Each weft thread passes over and under each warp thread in a simple alternating pattern. This tight interlacing means threads release slowly and cleanly — ideal for controlled fraying.
- Twill weave (denim, gabardine, chambray): Threads pass over multiple warp threads in a diagonal pattern. Fraying is possible but can be uneven and the diagonal structure may cause threads to clump.
- Satin weave (satin, charmeuse): Long floats of thread sit on the fabric surface. These fray very readily and can be difficult to control — expect loose, silky fringe.
- Loose weave fabrics (burlap, hessian, loosely woven gauze): These fray fastest of all, with threads practically falling out. Excellent for decorative fringe but requires a stay-stitch line to prevent over-fraying.
Tightly woven fabrics with high thread counts, such as high-quality quilting cotton with 200 threads per inch or more, require more effort and patience to fray but produce a finer, more refined fringe.
Tools You Need to Fray Fabric Edges Effectively
You do not need specialized equipment to fray woven fabric edges, but the right tools will make the process faster and give you cleaner results. Here is what works best:
- Sharp fabric scissors or rotary cutter: A clean, straight cut is the foundation of good fraying. Ragged cuts lead to uneven fringe. A rotary cutter with a cutting mat produces the straightest edge with minimal effort.
- Seam ripper: One of the most underrated tools for fraying. The hook blade catches under individual threads and pulls them out cleanly without disturbing neighboring threads.
- Pin or tapestry needle: Useful for loosening threads before pulling. Insert the tip under a thread and lift, then grip with fingers or tweezers to pull free.
- Tweezers: For fine or tightly woven fabrics where fingers cannot grip individual threads. Pointed tweezers give the best control.
- Wire brush or stiff-bristled toothbrush: Excellent for accelerating fraying on loosely woven fabrics or denim. Brushing vigorously along the cut edge pulls out multiple threads at once.
- Sewing machine (for stay-stitching): Before fraying, a line of machine stitching parallel to the cut edge prevents the frayed area from extending beyond the intended depth.
- Washing machine: After hand-fraying, a wash cycle — especially on a normal or heavy cycle — accelerates and softens the fringe, giving it a natural, worn appearance.
Step-by-Step Methods for Fraying Woven Fabric
There are several distinct approaches to fraying fabric edges, and the best one depends on the fabric type, the desired result, and how much time you want to invest.
Method 1: Hand-Pulling Threads (The Classic Approach)
- Cut your fabric in a straight line using sharp scissors or a rotary cutter and cutting mat. Make sure the cut follows the grain line — parallel to either the warp or weft threads.
- Decide on the depth of fringe you want. Mark this distance from the cut edge with a fabric marker or chalk. For a standard decorative fringe, 1 inch is a good starting point; for a dramatic look, go up to 2 or even 3 inches.
- Sew a straight stitch along your marked line using a sewing machine. This stay-stitch line acts as a barrier, stopping the fraying exactly where you want it.
- Starting at one end, insert a pin or seam ripper under the first crosswise thread near the cut edge and lift it away from the fabric.
- Grip the thread with your fingers or tweezers and pull it out across the full width of the fabric. If it snaps, restart from where it broke.
- Continue pulling threads one by one, working from the cut edge toward your stay-stitch line.
- Once all crosswise threads are removed to the desired depth, the remaining lengthwise threads form the fringe. Gently tug each fringe strand to straighten and separate them.
Method 2: Brush Fraying for Denim and Heavy Woven Fabrics
For heavier woven fabrics like denim, canvas, or thick cotton twill, hand-pulling individual threads is time-consuming and frustrating. A stiff wire brush or a dedicated fabric brush speeds things up considerably.
- Cut and stay-stitch as described above.
- Score the cut edge lightly with scissors — make several small snips perpendicular to the edge, about every half inch. This gives the brush something to catch on.
- Hold the fabric firmly on a flat surface and brush vigorously along the cut edge using back-and-forth strokes. A pet slicker brush, a wire suede brush, or a stiff nail brush all work well.
- After several minutes of brushing, you'll see weft threads pulling loose. Remove any large clumps by hand.
- Toss the piece in the washing machine on a normal cycle. The agitation pulls out additional threads and softens the fringe dramatically.
- Tumble dry and brush again if desired for a more distressed look.
This method is widely used for creating distressed denim hems. Denim shorts with frayed hems typically require 3 to 5 wash-and-brush cycles to achieve the fully softened, heavily frayed look seen in fashion retail.
Method 3: Washing Machine Fraying
For loosely woven fabrics or when you want a soft, natural-looking fray with minimal hand work, the washing machine does most of the labor for you.
- Cut the fabric edge straight and stay-stitch at the desired fringe depth.
- Make snips into the edge every ½ to 1 inch to help the machine grab threads.
- Wash on a normal or heavy-duty cycle with warm water. Do not use a laundry bag — direct agitation is what causes fraying.
- Dry in the dryer on medium-high heat. The tumbling action continues to pull and loosen threads.
- Inspect and remove any long, tangled threads by hand. Repeat the wash-dry cycle for more pronounced fraying.
This method works especially well for cotton gauze, muslin, and loosely woven linen. It produces a soft, lived-in fringe rather than a crisp, structured one.
Method 4: Scoring and Snipping for Controlled Distressing
When you want fraying in a specific area rather than along a full edge — such as a patch on a jacket or a distressed section of a woven bag — use scissors to score and snip selectively.
- Mark the area to be frayed with chalk.
- Make closely spaced cuts into the fabric, cutting only partway in — not through the entire piece. Cuts should run along the grain.
- Use a seam ripper to pull out short sections of thread between cuts.
- Wash and dry to soften and extend the fraying naturally.
Best Fabrics for Fraying: A Practical Comparison
Not every woven fabric is equally well-suited to fraying. The table below gives a practical overview of how common woven fabrics behave when frayed, so you can choose the right material for your project.
| Fabric | Weave Type | Ease of Fraying | Fringe Quality | Best Method |
|---|---|---|---|---|
| Cotton muslin | Plain | Very easy | Soft, even | Hand-pull or machine wash |
| Linen | Plain | Easy | Defined, structured | Hand-pull |
| Denim | Twill | Moderate | Heavy, textured | Brush + machine wash |
| Burlap / Hessian | Plain (loose) | Extremely easy | Rustic, coarse | Hand-pull (fast) |
| Chambray | Plain | Easy | Fine, soft | Hand-pull or machine wash |
| Wool tweed | Twill / plain | Moderate to difficult | Fuzzy, warm | Hand-pull with tweezers |
| Silk organza | Plain (fine) | Easy but delicate | Sheer, delicate | Hand-pull only |
| Canvas | Plain (heavy) | Difficult | Stiff, chunky | Brush + repeated washing |
How to Control Fraying Depth and Prevent Over-Fraying
One of the most common mistakes when fraying woven fabric is losing control of how far the fraying travels into the fabric. Without a barrier, fraying continues inward with every wash and every pull, eventually destroying the piece. There are three reliable ways to set a hard stop.
Stay-Stitching
A row of machine stitching is the most common and effective fraying barrier. Set your sewing machine to a short straight stitch (stitch length of about 2 mm works well) and sew a line parallel to the cut edge at the exact depth you want the fringe to stop. For example, if you want a 1.5-inch fringe, stitch a line 1.5 inches from the cut edge. The interlocked machine stitches lock the warp and weft threads together at that point, preventing any further thread migration.
For a decorative touch, use a contrasting thread color for the stay-stitch line. It becomes a visible design element — a neat accent row separating the fringe from the body of the fabric.
Fray Check or Fabric Glue
Fray Check is a liquid seam sealant that bonds threads together when applied and dries clear and flexible. Apply a thin line of Fray Check along the line where you want fraying to stop, allow it to dry completely (usually 10 to 15 minutes), and then begin pulling threads from the cut edge toward the sealed line. The glued threads will not release beyond that point.
This method is particularly useful on projects where machine stitching would be visible or impractical, such as small crafts, bookmarks, or frayed patches.
Pulling a Thread to Mark the Line
A traditional tailor's technique for perfectly straight edges on woven fabric: rather than marking with chalk and guessing, pull a single weft thread out at the depth you want to mark. This leaves a clear, slightly open channel in the fabric that acts as a visual guide — and when you sew your stay-stitch line exactly in this channel, the stitching follows the grain perfectly. This is especially valuable for linen and loosely woven fabrics where a straight-line cut matters visually.
Creative Applications: Where Frayed Edges Work Best
Frayed edges on woven fabric are far more versatile than most people realize. The technique shows up across fashion, home décor, quilting, and handmade gifts.
Clothing and Fashion
Frayed denim hems on jeans and shorts have been a fashion staple since the 1970s and remain consistently popular. The frayed hem look typically requires cutting the original hem off, removing about ½ inch of weft threads, and then washing multiple times to get the signature soft, uneven fringe. Fashion retailers sometimes charge $20 to $50 more for factory-distressed denim compared to plain equivalents — a fraying job you can easily do at home for free.
Woven linen shirts and blouses with frayed hem edges have become a popular style in resort and bohemian fashion. The frayed cuffs and hems on linen work particularly well because linen's relatively thick, stiff threads create clean, structured fringe rather than a fluffy mess.
Frayed woven fabric patches sewn onto jackets, bags, or jeans add handmade character. Small squares of burlap, linen, or denim with all four edges frayed to about ½ inch can be hand-stitched or machine-applied for a patchwork effect.
Home Décor and Textiles
Table runners made from natural woven fabrics — linen, cotton, or a linen-cotton blend — with frayed ends are among the most popular DIY home décor projects. A simple rectangle of fabric with the short ends frayed to 2 inches looks intentional and refined, not unfinished.
Throw pillow covers in woven cotton or linen with frayed edges around a central panel give a farmhouse or Scandinavian aesthetic with very little effort. The same principle applies to framed fabric wall art — a piece of loosely woven linen with frayed edges stretched over a canvas frame has a clean, textural look.
Napkins made from woven cotton with all four edges frayed are genuinely practical and attractive. Cut squares of 18 x 18 inches from cotton fabric, stay-stitch 1 inch from each edge, and pull threads to the stitching line. After one machine wash they soften and look polished.
Quilts and Rag Quilts
Rag quilts are specifically designed to be frayed. The quilt blocks are assembled with seams on the outside (the wrong side faces outward), and the seam allowances are clipped every ½ inch. When the finished quilt is washed, the exposed seam allowances fray into soft, fluffy ridges between each block. The result is a quilt with a handmade, cozy texture that becomes softer with every wash. Most rag quilt patterns use 6-inch squares with 1-inch seam allowances, giving each block a ½-inch fringe all around after washing.
Gift Wrap and Ribbon Alternatives
Strips of woven fabric with both long edges frayed make beautiful, reusable gift ribbon alternatives. Cut strips of cotton or linen about 1 to 2 inches wide and any length, then fray both edges to about ¼ inch. These fabric ribbons tie into bows, can be reused, and have a much more personal quality than plastic ribbon.
Common Mistakes When Fraying Woven Fabric (and How to Fix Them)
Even straightforward techniques have pitfalls. These are the most frequent problems people run into when fraying fabric edges, along with practical fixes.
The Fringe Is Uneven or Clumping
Uneven fringe usually results from an off-grain cut. If your scissors drifted across the grain while cutting, different lengths of threads will be left standing. To fix: trim the cut edge again, this time following a pulled thread as your guide to ensure you're cutting exactly on grain. Then restart pulling threads from the newly straightened edge.
Clumping happens when multiple threads tangle together during washing. Before washing, run your fingers along the fringe to separate individual threads. After washing, do this again while the fabric is still damp — threads separate much more easily before they dry in a clump.
Threads Keep Breaking Before Pulling All the Way Across
On wide pieces of fabric, threads often snap partway across. This is especially common with cotton and with tightly woven fabrics. Instead of trying to pull one thread all the way across a wide piece, pull it from the center: loosen the thread in the middle with a pin, then pull toward one edge, and then pull the remaining half toward the other edge. This halves the tension and reduces breakage significantly. For fabric wider than 24 inches, work in thirds rather than halves.
Fraying Is Traveling Too Far Into the Fabric
If you skipped the stay-stitching step, fraying can progress well beyond your intended depth — especially after washing. At this point, your best option is to apply Fray Check or a thin line of fabric glue along the current fraying line, let it dry completely, and then trim any excessively long, straggly threads back to an even length. Going forward, always stay-stitch before fraying.
The Woven Fabric Is Too Tightly Woven to Fray Easily
High thread count fabrics — fine quilting cottons, tightly woven shirting, poplin — are frustrating to fray by hand. The threads are so fine and so tightly interlaced that a pin barely gets under them. Try soaking the edge of the fabric in warm water for a few minutes before attempting to pull threads. The water relaxes the fiber slightly and reduces friction, making thread removal noticeably easier. A warm iron pressed lightly along the edge after soaking also helps.
The Fringe Looks Too Sparse or Thin
A thin-looking fringe usually means the fabric has a low thread count or you're working with a very fine yarn. You can increase the visual density of the fringe by increasing its depth — instead of a 1-inch fringe, extend it to 2 inches. The extra length makes the same number of threads look much fuller. Alternatively, layer two pieces of frayed fabric edge-to-edge for a double fringe effect.
Caring for Frayed Woven Fabric After the Project Is Finished
Frayed fabric requires a bit more attention during laundering than finished-edge fabric, but it is by no means high-maintenance. Follow these guidelines to keep frayed edges looking intentional rather than worn-out.
- Wash in a mesh laundry bag once the fraying is at your desired depth. This prevents fringe from tangling with other garments or with itself in the machine.
- Separate fringe strands while damp. After each wash, run your fingers through the fringe before laying flat to dry or tumble drying. This prevents permanent clumping.
- Trim any stragglers. Over time, individual fringe threads will grow longer or become frayed themselves. A quick trim with sharp scissors every few washes keeps the fringe looking neat.
- Avoid fabric softener on loosely woven frayed items. Fabric softener coats fibers and can cause fringe strands to stick together, making them harder to separate.
- Check the stay-stitch line periodically. If the stitching begins to loosen or break, reinforce it with another row of stitching before the fraying advances further.
With reasonable care, frayed woven fabric items — table runners, napkins, denim garments — hold up through dozens of wash cycles without losing their appeal. In many cases, they look better after repeated washing, as the fringe softens and acquires the subtle, broken-in texture that makes frayed fabric so appealing in the first place.
Fraying vs. Other Edge Finishing Techniques: When Fraying Is and Is Not the Right Choice
Fraying is one of many ways to treat the raw edge of woven fabric. Understanding how it compares to alternatives helps you choose the right finish for each project.
| Technique | Look | Best For | Durability |
|---|---|---|---|
| Fraying | Casual, bohemian, rustic | Décor, denim, linen, crafts | Moderate (needs maintenance) |
| Hem (folded) | Clean, tailored | Garments, formal textiles | High |
| Serged / overlocked edge | Functional, neat | Garment construction | Very high |
| Bias tape binding | Decorative and functional | Quilts, aprons, bags | High |
| Pinking shears | Zigzag edge, minimal fraying | Woven fabric seam allowances | Moderate |
| Fray Check / seam sealer | Invisible (no fraying) | Preventing unintended fraying | High |
Fraying is the right choice when the aesthetic calls for texture, informality, and a handmade quality. It is not the right choice for garments that will receive heavy use along the edge (waistbands, armholes, collar edges) or for any woven fabric that is not a true woven — such as knits or felts, which do not fray predictably and may curl or distort instead.
Tips for Getting Professional-Looking Frayed Edges Every Time
The difference between frayed edges that look deliberately crafted and frayed edges that simply look damaged comes down to a few key habits.
- Always cut on the grain. Pull a thread first to find the true straight grain, then cut along that line. Off-grain cuts lead to uneven fringe and diagonal thread drift.
- Pre-wash the fabric. Washing before cutting removes sizing (the starch-like finish applied to new fabric) and causes the fabric to shrink before you cut. This means the fringe will not shrink unevenly after you complete the project.
- Stay-stitch before starting. This single step prevents the most common disaster in fraying — losing control of how far the threads migrate.
- Work slowly on fine fabrics. For delicate woven fabrics like silk, organza, or fine linen, patience pays off. Rushing causes threads to snap and fringe to look ragged.
- Finish with a wash. Even when fraying by hand, a final machine wash softens the fringe and gives it a natural, finished appearance that hand-fraying alone cannot replicate.
- Trim the fringe to an even length after washing and drying if you want a more polished result. Use sharp scissors and cut parallel to the original edge.
- Use the right tool for each fabric weight. Tweezers for fine fabrics, a seam ripper for medium weights, and a wire brush for heavy woven fabrics like denim and canvas.
 PREV
PREV