English


How to Crochet an Edge on Woven Fabric: Complete Guide
Content
- 1 The Short Answer: Yes, You Can Crochet an Edge on Woven Fabric — Here's How
- 2 What Makes Woven Fabric Different from Knit Fabric When Crocheting an Edge
- 3 Tools and Materials You Need Before You Start
- 4 How to Prepare the Edge of Woven Fabric for Crocheting
- 5 Step-by-Step: How to Crochet a Basic Single Crochet Edge on Woven Fabric
- 6 Popular Crochet Edge Styles to Add After the Foundation Row
- 7 Choosing the Right Yarn for Crocheting onto Woven Fabric
- 8 Common Mistakes When Crocheting an Edge on Woven Fabric
- 9 Projects That Benefit Most from a Crochet Edge on Woven Fabric
- 10 Tips for Achieving a Clean, Professional Result Every Time
- 11 Working with Different Types of Woven Fabric: What Changes
The Short Answer: Yes, You Can Crochet an Edge on Woven Fabric — Here's How
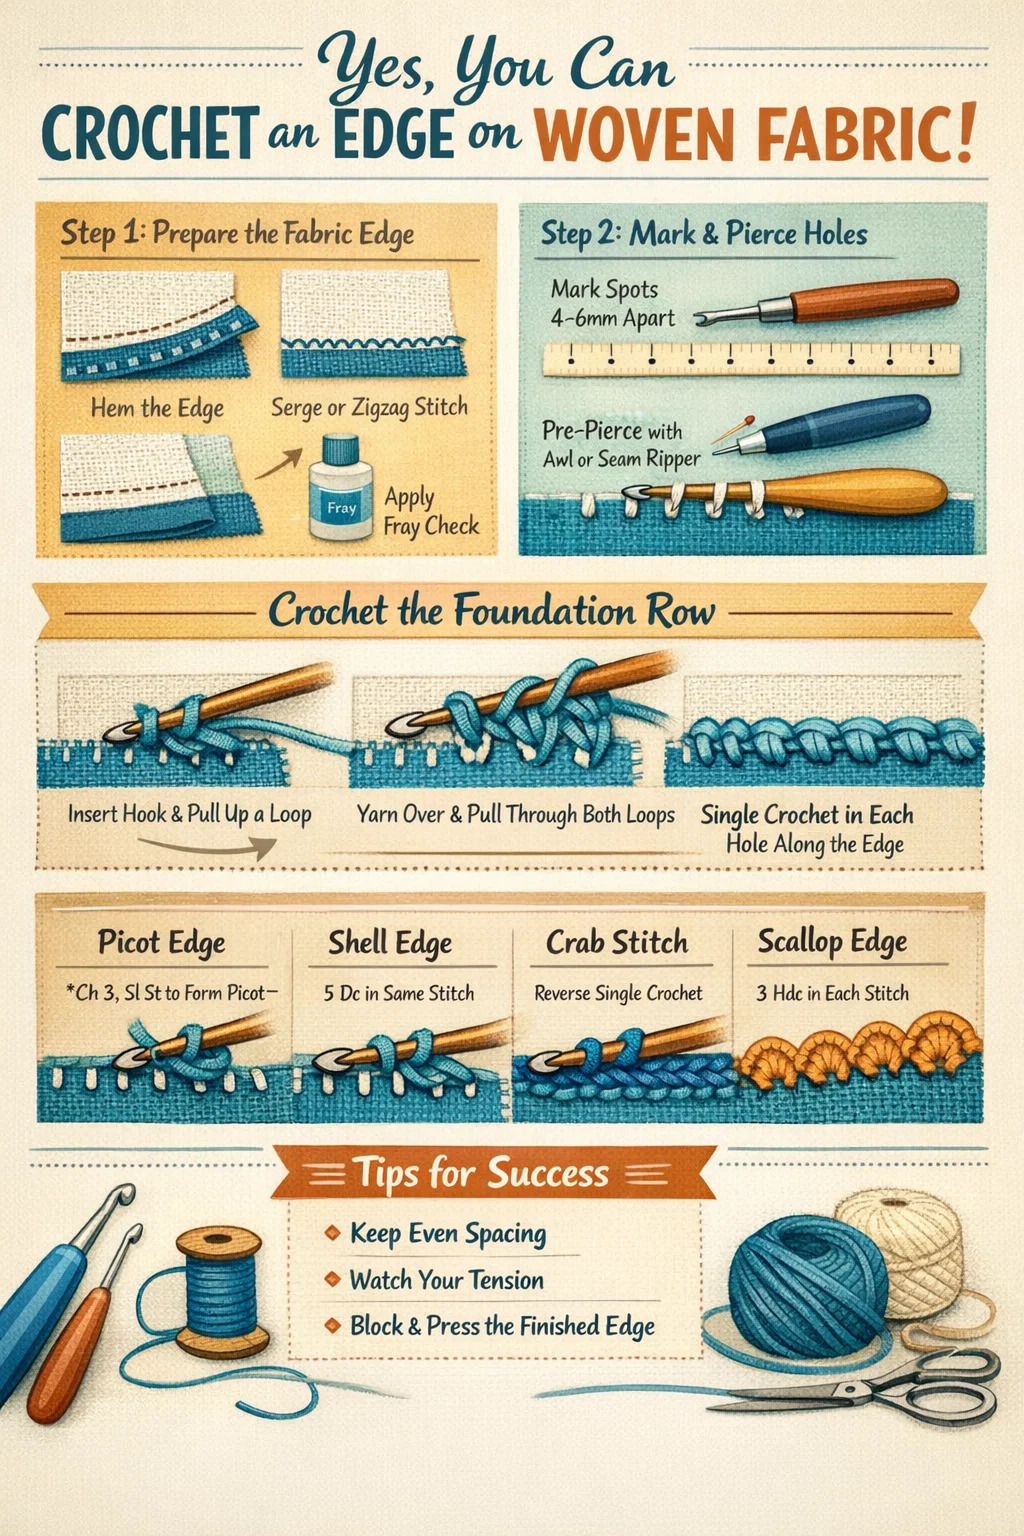
Crocheting an edge onto woven fabric is entirely possible and produces a polished, decorative finish that also prevents fraying. The key is preparing the fabric correctly, using the right hook size, and working your foundation row of single crochet stitches evenly along the edge before building any decorative pattern on top. Most crafters find that a US size D/3 (3.25mm) to F/5 (3.75mm) crochet hook works well for medium-weight woven fabric, though you should always test on a scrap piece first.
Unlike knitted fabric, woven fabric does not have natural loops to insert your hook into. Instead, you pierce through the fabric itself or work through pre-made holes, which is why technique and preparation make all the difference. Once you understand the mechanics, adding a crochet edge to woven fabric — whether it's cotton, linen, denim, or any other woven textile — becomes a repeatable, satisfying skill.
What Makes Woven Fabric Different from Knit Fabric When Crocheting an Edge
Understanding the structural difference between woven fabric and knit fabric is essential before you pick up your hook. Woven fabric is constructed by interlacing two sets of yarns — the warp (running lengthwise) and the weft (running crosswise) — at right angles. This creates a firm, stable textile with very little stretch. Knit fabric, on the other hand, is formed by interlocking loops, giving it inherent elasticity.
When you crochet an edge onto a knit piece, you typically pick up existing loops from the fabric's surface. With woven fabric, there are no loops waiting for you. You must either pierce the fabric with your hook or create a series of evenly spaced holes beforehand. This distinction changes nearly every aspect of the process, from how you set up your foundation row to how tightly you pull each stitch.
Woven fabric also frays at cut edges, unlike knit fabric which curls rather than frays. A crochet edge serves a dual purpose on woven textiles: it decorates and it seals. That's why this technique is especially popular on items like linen napkins, denim jackets, cotton tote bags, and woven blankets.
Tools and Materials You Need Before You Start
Getting the right tools ready before you begin saves time and prevents frustration. Here's what you'll need:
- Crochet hook: Choose a hook slightly larger than what you'd use for your yarn alone. For lightweight cotton yarn on medium woven fabric, a D/3 or E/4 hook is common. For bulkier yarn or heavy denim, go up to G/6 or H/8.
- Yarn: Cotton yarn is the most popular choice for woven fabric edging because it shares similar care requirements with most woven textiles. Acrylic works too but may behave differently in the wash. Match fiber content when possible.
- Awl, stiletto, or seam ripper: Used to pre-pierce holes along the fabric edge at even intervals if you're not piercing directly with your hook.
- Ruler or marking tool: To space your entry points evenly — typically every 3mm to 5mm for lightweight fabric, every 5mm to 8mm for heavier fabric.
- Fabric stabilizer or fray check liquid: Optional but helpful for very loosely woven or delicate textiles. Apply along the edge before crocheting to prevent unraveling as you work.
- Sharp scissors: For trimming yarn ends cleanly once you've finished.
- Tapestry needle: For weaving in yarn ends securely once the edging is complete.
One detail many beginners overlook: wash and dry your woven fabric before adding a crochet edge. Most woven fabrics, especially cotton and linen, shrink slightly in the first wash. If you attach the crochet edge before pre-washing, the fabric may pucker and distort after laundering.
How to Prepare the Edge of Woven Fabric for Crocheting
Preparation is the step most tutorials rush through, but it determines whether your finished edge lies flat and looks professional or puckers and pulls. Follow these steps carefully:
Step 1: Finish the Raw Edge First
Before crocheting, secure the raw edge of your woven fabric so it doesn't continue to fray while you work. You have several options:
- Fold the edge over once (about 6mm) and press with an iron, then fold again and press. Sew a narrow hem by machine or by hand before crocheting into the folded edge.
- Apply fray check liquid along the raw edge and let it dry completely before proceeding.
- Serge or zigzag stitch the raw edge on a sewing machine if you have one available.
Working into a folded and hemmed edge gives the crochet stitches a more stable foundation and creates a neater back side on the finished piece.
Step 2: Mark Even Spacing Along the Edge
Even spacing is what separates a professional-looking crochet edge from one that waves and bunches. Use a fabric marker or tailor's chalk to mark dots along the edge where you'll insert your hook. A practical rule of thumb:
| Fabric Type | Suggested Spacing | Hook Size Range |
|---|---|---|
| Lightweight cotton / muslin | 3–4 mm apart | D/3 – E/4 |
| Medium cotton / quilting fabric | 4–6 mm apart | E/4 – G/6 |
| Denim / canvas / heavy linen | 6–8 mm apart | G/6 – I/9 |
| Loosely woven / open weave | Use existing fabric gaps | Match yarn weight |
Step 3: Pre-Pierce the Holes (Optional but Recommended)
Using an awl, stiletto tool, or the tip of a seam ripper, gently push a hole through the fabric at each marked point. This is especially important for tightly woven fabrics like denim or canvas, where forcing the crochet hook through without preparation can distort the weave or break warp threads. For loosely woven fabric, your hook may slide through easily without pre-piercing.
Step-by-Step: How to Crochet a Basic Single Crochet Edge on Woven Fabric
The single crochet foundation row is the base for almost every decorative crochet edge. Master this first before attempting shell edges, picot edges, or scallop patterns.
- Attach your yarn: Make a slip knot and place it on your hook. Insert the hook through the first hole at the right-hand end of your fabric edge (if you're right-handed). Pull up a loop of yarn through the fabric hole so you have two loops on your hook, then yarn over and pull through both loops to create your first single crochet. Alternatively, hold the yarn tail on the back of the fabric and crochet over it for the first few stitches to secure it without a knot.
- Work single crochet stitches across: Insert your hook through the next hole, pull up a loop (2 loops on hook), yarn over, pull through both loops. That's one single crochet. Repeat across the entire edge.
- Handle corners: At corners, work 3 single crochet stitches into the same corner hole or point. This allows the edge to turn the corner without pulling tight.
- Join and continue (for rectangular items): When you reach the starting point on a rectangular piece, you can either fasten off and weave in the ends or join with a slip stitch and continue crocheting additional decorative rows.
- Fasten off and weave in ends: Cut the yarn leaving a 6-inch tail. Draw the tail through the last loop to secure. Thread the tail onto a tapestry needle and weave it under several stitches on the back of the work before trimming.
Tension matters enormously here. If you pull too tight, the fabric edge will pucker. If your stitches are too loose, the edge will flop. Aim for stitches that lie flat against the fabric without distorting it. Practice on a scrap before working on your final piece.
Popular Crochet Edge Styles to Add After the Foundation Row
Once your single crochet foundation row is in place and lying flat, you can add a second (or third) decorative row in any number of styles. Here are the most popular and practical options:
Picot Edge
A picot edge creates small loops or points along the border, giving it a delicate, vintage look. It's especially popular on linen napkins and cotton handkerchiefs. To work a basic picot: single crochet into the first stitch, *chain 3, slip stitch back into the first chain (forming a small loop), single crochet into the next 2 or 3 stitches*, repeat from * to * across. The result is a row of tiny raised points every few stitches.
Shell Edge (Fan Edge)
Shell edges are created by working multiple double crochet stitches into the same stitch, fanning out into a shell shape. A classic 5-stitch shell edge works like this: skip 2 stitches, work 5 double crochet into the next stitch, skip 2 stitches, slip stitch into the next stitch, repeat across. This creates a bold, scalloped border that works beautifully on woven blankets and cushion covers.
Reverse Single Crochet (Crab Stitch)
Also called the crab stitch, this is worked in the opposite direction to normal crocheting — from left to right instead of right to left. It produces a twisted, rope-like edge that's subtle but very polished. Many professional sewists and crafters use this as a finishing edge on woven garments and accessories because it looks intentional without being fussy. It's one of the most commonly recommended edging stitches for woven denim and canvas projects.
Blanket Stitch Crochet Edge
This technique blends embroidery and crochet. You first work blanket stitches along the fabric edge using yarn and a tapestry needle, creating evenly spaced loops. Then you insert your crochet hook into those loops and work single crochet or other stitches through them. This is particularly useful when working with very tightly woven fabric where piercing directly is difficult, or when you want a raised, defined border.
Scallop Edge
Similar to a shell edge but with a softer, more rounded appearance. Work 3 or 4 half double crochet into each stitch, skip one stitch, repeat. The result is a gentle wavy border that suits lightweight woven fabrics like cotton voile or thin linen particularly well.
Choosing the Right Yarn for Crocheting onto Woven Fabric
Yarn selection is not just an aesthetic decision — it's a practical one. The wrong yarn can cause the edge to stretch, pill, or deteriorate at a completely different rate than the woven fabric itself.
- Cotton yarn on cotton or linen woven fabric: The best match. Both have similar care instructions, similar stretch behavior (minimal), and similar durability. 100% cotton crochet thread or DK-weight cotton yarn works well for most projects.
- Wool yarn on wool woven fabric: Another natural match. Be aware that both will felt if washed in hot water, so if you want the piece to remain washable, use a superwash wool or go with cotton.
- Acrylic yarn on synthetic or mixed woven fabric: Works fine functionally, but acrylic is more prone to pilling at friction points. It also has slightly more stretch than cotton, which can cause the edge to loosen over time.
- Embroidery floss or crochet thread: Ideal for lightweight woven fabric like fine cotton or muslin. These thin threads produce very fine, delicate edging and are used for heirloom-quality linens and handkerchiefs. Use a steel crochet hook (sizes 0 to 7) rather than an aluminum hook for these finer threads.
As a general rule, match fiber content where possible, and always check that the yarn's care instructions are compatible with the fabric's care instructions. A crochet edge made from dry-clean-only wool on a machine-washable cotton tote bag is a mismatch that will cause problems after the first wash.
Common Mistakes When Crocheting an Edge on Woven Fabric
Even experienced crocheters run into problems when working on woven fabric for the first time. Here are the most frequent issues and how to avoid them:
Uneven Spacing
Inserting the hook too close together creates a gathered, ruffled edge. Inserting too far apart creates gaps and a loose, floppy border. Always pre-mark your spacing before you begin. If you notice uneven tension partway through, it's worth starting over — an uneven foundation row will affect every decorative row above it.
Puckering Along the Edge
Puckering almost always means your tension is too tight. Loosen your grip on the yarn and try working the stitches a little more loosely. If puckering persists, try going up one hook size. Some crafters also find it helpful to block (wet and pin flat to dry) the finished piece to relax the stitches and coax the edge flat.
Fraying During the Process
If your woven fabric frays as you work, the raw edge wasn't stabilized properly before starting. Stop and apply fray check liquid to the frayed section, let it dry, and then continue. Going forward, always finish the raw edge before crocheting onto it.
Holes That Are Too Large or Distorted
If you're using an awl to pre-pierce and the holes look stretched or distorted, your tool is too thick for the fabric. Use a thinner stiletto or a tapestry needle instead to create smaller, cleaner openings. On tightly woven fabric like canvas, a leather stitching awl with a very fine tip works well.
Corners That Pull or Cup
Forgetting to add extra stitches at corners is a classic error. At every outer corner, always work at least 3 stitches into the corner point. At inner corners (like a neckline notch), decrease by working 2 stitches together to prevent the edge from bubbling outward.
Projects That Benefit Most from a Crochet Edge on Woven Fabric
This technique is versatile enough to work on a wide range of items. Some of the best applications include:
- Linen napkins and placemats: A picot or scallop crochet edge in white or natural cotton thread elevates simple linen napkins into heirloom-quality table linens. This is one of the most traditional applications of the technique.
- Denim jackets and jeans: Adding a bold crochet shell edge to the hem, cuffs, or collar of a denim jacket is a popular upcycling project. The stiffness of denim provides an excellent stable foundation for the crochet stitches.
- Cotton tote bags: A single crochet or crab stitch edge along the top opening of a woven cotton tote reinforces the edge and adds a decorative detail at the same time.
- Woven throw blankets: Adding a crochet edging to a store-bought woven throw is a quick way to personalize it. Use chunky yarn and a larger hook for faster results on full-size blankets.
- Fabric bookmarks: Small rectangles of woven fabric with a scallop or shell crochet edge make unique, handmade bookmarks.
- Garment hems and sleeves: Replacing a plain sewn hem on a woven cotton dress or skirt with a crochet shell or picot edge adds texture and visual interest. This works best on medium-weight woven fabrics where the crochet edge won't weigh down the drape of the garment.
Tips for Achieving a Clean, Professional Result Every Time
A few habits separate consistently good results from inconsistent ones:
- Always swatch first. Work a 10cm section of single crochet along a scrap of the same woven fabric before starting your project. Assess the tension, the stitch density, and how the fabric behaves. Adjust hook size or spacing before committing to the full piece.
- Work with the right side of the fabric facing you. This ensures the neater side of your stitches shows on the front of the finished piece.
- Count your stitches at the end of the foundation row. Before adding decorative rows, count the total stitches to make sure you have an appropriate multiple for your chosen pattern. Shell edges typically require a stitch count divisible by 6 or 8. Adjust by adding or subtracting a stitch or two in inconspicuous areas.
- Block the finished edge. Wet blocking (gently wetting the piece and pinning it flat to dry) smooths out uneven tension, softens the stitches, and helps the edge lie perfectly flat. This step makes a noticeable difference, especially on decorative edges like shells or scallops.
- Use stitch markers at corners and midpoints. On long edges, place a stitch marker every 20 stitches. This makes it easier to check that your stitches are evenly distributed and helps you pick up your place if you need to stop and restart.
- Don't skip the press with an iron after completing the edge. A light press with a pressing cloth on the crocheted edge can make it look significantly more finished. Use the steam setting on cotton yarns and fabrics, or a dry iron on a cooler setting for acrylic.
Working with Different Types of Woven Fabric: What Changes
Not all woven fabrics behave the same way under a crochet hook. Here's how to adjust your approach for specific fabric types:
Cotton Quilting Fabric
One of the easiest woven fabrics to crochet onto. It's stable, doesn't stretch, and holds its shape well. The weave is tight enough to prevent fraying quickly but not so tight that piercing is difficult. A US E/4 (3.5mm) hook and DK-weight cotton yarn at 4mm spacing is a reliable starting point.
Linen
Linen is stiffer than cotton and frays more aggressively at cut edges. Always finish the edge with fray check or a turned hem before crocheting. Linen softens with washing, so the finished item will become more pliable over time. Cotton crochet thread in a complementary natural tone produces a classic, elegant result on linen.
Denim
Denim is one of the most popular woven fabrics for crochet edging because the contrast between the structured, utilitarian fabric and the soft, handmade crochet border is visually striking. However, denim is dense and resists piercing. Pre-pierce every hole with a leather awl or thick tapestry needle. Use a robust hook (G/6 to I/9) and a sturdy cotton or cotton-blend yarn. Expect the process to go more slowly than on lighter woven fabrics.
Open-Weave and Loosely Woven Fabric
Fabrics like burlap, loosely woven linen, or open-weave cotton often have gaps in the weave large enough to insert a crochet hook without any pre-piercing. You can work directly through the natural spaces in the fabric. The challenge is that these fabrics fray very easily, so stabilizing the edge before you begin is non-negotiable. Apply fray check generously and let it cure fully.
Flannel and Woven Wool
Woven wool and flannel are soft and compress easily under tension. Use a slightly looser tension than you think you need, as these fabrics can pucker quickly. Wool yarn on woven wool fabric produces a nearly seamless look where the crochet edge blends into the fabric naturally. Consider a crab stitch or single crochet edge for a subtle finish rather than a bold shell pattern.
 PREV
PREV