English


How Do You Line a Dress: Step-by-Step Guide with Woven Fabric Tips
Content
- 1 How Do You Line a Dress: The Direct Answer
- 2 Why Lining a Dress Actually Matters
- 3 Choosing the Right Lining Fabric
- 4 Cutting the Lining Pieces Correctly
- 5 Constructing the Lining Shell
- 6 Attaching the Lining to the Dress
- 7 Hemming the Lining Separately from the Dress
- 8 Lining a Sleeveless Dress vs. a Dress with Sleeves
- 9 Partial Lining and Half-Lining Options
- 10 Common Lining Mistakes and How to Avoid Them
- 11 Tips for Lining Specific Dress Styles
- 12 Tools That Make Lining Easier
- 13 Frequently Asked Questions About Lining a Dress
How Do You Line a Dress: The Direct Answer
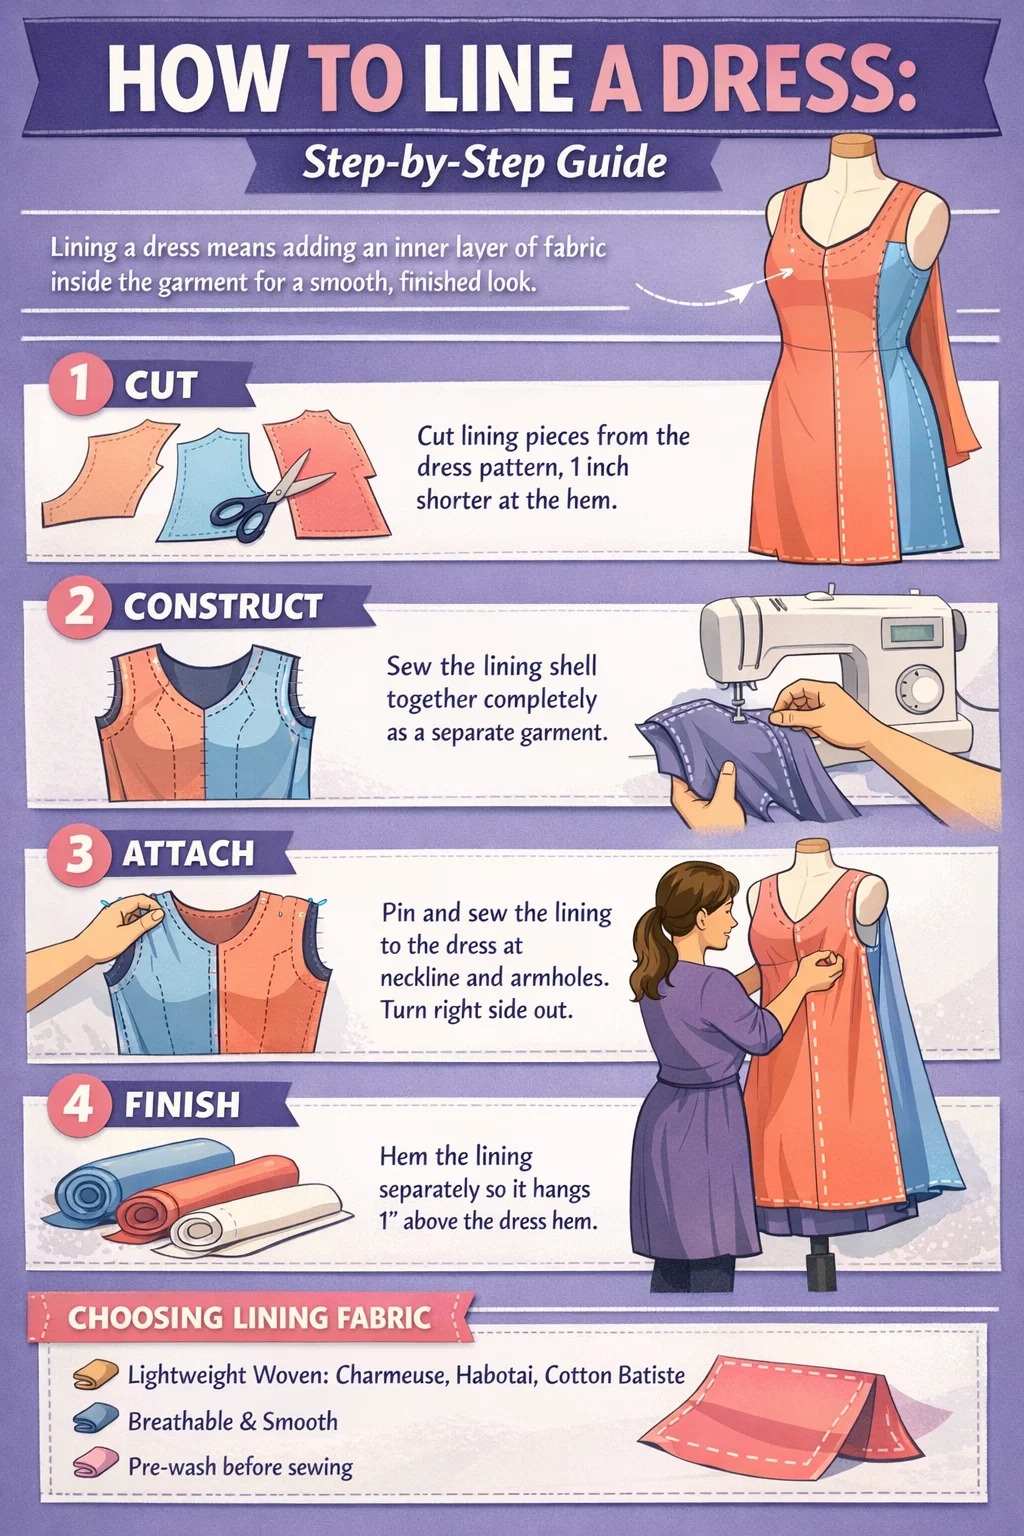
Lining a dress means attaching an inner layer of fabric — usually a lightweight woven fabric like polyester charmeuse, silk habotai, or cotton batiste — to the inside of the outer shell so the dress holds its shape, feels comfortable against the skin, and hides interior seam allowances. The process involves cutting the lining pieces from the same pattern pieces as the dress (with minor adjustments), sewing the lining separately, and then joining it to the dress at the neckline, armholes, or zip opening before turning the whole garment right side out.
Most home sewists complete a basic dress lining in four stages: cut, construct, attach, and finish. Whether you are working with a structured bodice or a flowy skirt, the core logic is the same. What changes is which seams you join first and how you handle the hem.
Below, you will find a step-by-step breakdown of each stage, guidance on choosing the right woven fabric for your lining, and tips that professional dressmakers use to get clean results every time.
Why Lining a Dress Actually Matters
Before diving into technique, it helps to understand why lining is worth the extra effort. Many beginners skip the step to save time, then regret it after the first wear.
- Structure and silhouette: Lining stabilizes the outer fabric, preventing it from stretching or sagging over time. This is especially important for woven fabric with an open weave or significant drape.
- Comfort: Raw seam allowances, interfacing edges, and boning channels are scratchy. A lining conceals all of that and lets the dress glide smoothly over undergarments.
- Opacity: Even mid-weight fabrics can become transparent under bright lighting. A well-chosen lining eliminates that problem without adding visible bulk.
- Longevity: The outer fabric is protected from body oils and perspiration. The lining takes the day-to-day wear, extending the life of the dress significantly.
- Professional finish: A lined dress looks finished from the inside. For any garment you intend to sell or give as a gift, an unlined interior reads as unfinished work.
A 2022 survey by the American Sewing Guild found that among sewists who sew garments regularly, 68% reported that lining was the single technique that most improved the perceived quality of their finished pieces. That number is hard to argue with.
Choosing the Right Lining Fabric
The lining should always be a woven fabric — not a knit — unless your dress itself stretches significantly. Woven fabric is stable on the straight grain, which means it will not distort or create drag lines inside the garment. The general rule is: the lining should be lighter in weight than the outer shell and should have a similar or lower care requirement.
Common Lining Fabrics and When to Use Them
| Lining Fabric | Weight | Best For | Notes |
|---|---|---|---|
| Polyester charmeuse | Lightweight | Silk, chiffon, lace dresses | Very slippery; use clips, not pins |
| Silk habotai (China silk) | Ultralight | Delicate woven fabric dresses, couture | Luxurious feel; dry clean preferred |
| Cotton batiste | Light to medium | Cotton dresses, children's wear | Breathable; machine washable |
| Bemberg (cupro) | Light to medium | Wool, structured woven fabric shells | Breathable, anti-static; industry standard |
| Rayon lining | Medium | Day dresses, blazer-style dresses | Drapes well; can shrink if not pre-washed |
| Polyester taffeta | Medium | Ball gowns, formal wear | Adds body; rustles when walking |
Avoid stretchy lining materials like jersey or ponte inside a non-stretch woven fabric dress. The lining will pull the outer shell out of shape, causing bubbling and distortion across the front bodice in particular.
Always pre-wash your lining fabric before cutting using the same method you plan to use for the finished dress. Rayon lining, in particular, can shrink by as much as 5–8% in the first wash if not pre-treated — enough to pucker an entire skirt panel.
Cutting the Lining Pieces Correctly
In most cases, you cut the lining from the same pattern pieces as the dress. However, there are a handful of important adjustments that prevent the lining from showing below the hem or creating drag lines across the body.
Adjustments to Make Before Cutting
- Shorten the hem allowance: Cut the lining hem 1 inch (2.5 cm) shorter than the finished dress hem. This prevents the lining from peeking below the outer fabric when the garment hangs.
- Remove facing areas: If your dress has a separate facing at the neckline or armhole, you do not need to cut separate lining pieces for those areas — the lining itself acts as the facing. Eliminate any facing pattern pieces from the lining layout.
- Add ease at the back: For a fitted silhouette, add a 1-inch vertical pleat (sometimes called a "breathing pleat") at the center back of the lining. This prevents the lining from pulling tight when you sit down.
- Match the grain: The straight grain of the lining woven fabric must match the straight grain of the outer fabric on every piece. Cutting even slightly off-grain causes twisting and diagonal drag lines across the body.
- Transfer all markings: Copy every notch, dart, and center front/back marking to the lining pieces. These become critical reference points during assembly.
For a dress with pockets built into the side seams, cut the lining without pocket extensions unless you intend to bag-line the pockets as well (an advanced technique covered later in this article).
Constructing the Lining Shell
Sew the lining as a separate, complete garment before attaching it to the dress. This approach is called the "bag lining" or "lining by machine" method, and it produces professional results without hand-sewing.
Step-by-Step Lining Construction
- Sew all darts in the lining bodice. Press them in the opposite direction from the outer fabric darts — for example, if the outer darts are pressed toward the waist, press the lining darts toward the bust. This reduces bulk where the two layers meet.
- Join the bodice and skirt lining at the waist seam if your dress has a waist seam. Stitch and press the seam open for the flattest result.
- Sew the side seams of the lining, leaving the same opening as the outer dress for a zipper or button placket. Clip curves and notch seam allowances on any curved seam (like a princess seam) so the woven fabric lies flat.
- Stay-stitch the neckline and armholes of the lining at ⅝ inch (1.5 cm) from the cut edge. Stay-stitching prevents a woven fabric edge from stretching when you handle the piece during assembly.
- Do not hem the lining yet. The hem is always the last step and is finished separately from the dress hem to allow for slight length differences.
At this point, you should have two separate garments: the finished outer dress (hemmed, seams finished, zipper or closures installed) and the lining shell (all seams sewn, edges stay-stitched, but no hem and no closure).
Attaching the Lining to the Dress
This is the stage that confuses most beginners because the order of steps is counterintuitive. You will be working with the dress and lining inside out, stitching them together at the neckline or armhole, and then turning the whole thing right side out through an opening in the lining's back seam or through the zipper opening.
The Bag Lining Method (Most Common)
- Turn the outer dress inside out. Slide it over the lining, which is right side out, so the right sides of both garments face each other.
- Align the neckline edges, matching center front, center back, and shoulder seams precisely. Pin or clip all the way around.
- Stitch around the neckline at the seam allowance marked on your pattern (typically ⅝ inch / 1.5 cm). Use a slightly shorter stitch length — around 2.0 mm — for a crisp, smooth result on curved woven fabric edges.
- Clip the seam allowance at regular intervals around curves (approximately every ½ inch / 1.2 cm) and notch out any excess woven fabric at convex curves. This allows the seam to turn flat without puckering.
- If your dress has set-in sleeves or defined armholes, repeat the alignment and stitching process at each armhole opening.
- Reach through the zipper opening or through a gap left in the lining's back seam and pull the entire dress through to the right side. This is the satisfying moment where both layers flip into their correct position.
- Press the neckline and armhole seams from the lining side, rolling the seam slightly toward the lining so it is not visible from the outside.
Attaching the Lining at the Zipper
With the dress right side out, fold under the lining's seam allowances along both sides of the zipper tape and pin them in place so the folded edge sits just barely back from the zipper teeth — about ⅛ inch (3 mm). Slip-stitch the folded lining edge to the zipper tape by hand using a blind stitch. This encases the zipper tape completely and gives the inside of the dress a clean, couture appearance.
If you are using an invisible zipper, fold the lining edge under and slip-stitch it close to the zipper coil without catching the coil itself, so the zipper still functions freely.
Hemming the Lining Separately from the Dress
The lining hem and the outer hem are finished completely separately. Never stitch them together at the hem — doing so creates a tube that restricts walking and pulls the outer fabric upward when you move.
- Outer dress hem first: Hang the finished dress for 24 hours before hemming, especially if the skirt is cut on the bias or uses a loosely woven fabric. Gravity will pull the hem level, and you will get a more even finish.
- Measure the lining hem: Put the dress on a dress form or flat surface. The lining should hang approximately 1 inch (2.5 cm) above the finished outer hem. Fold and pin the lining hem up at that length.
- Finish the lining hem: Machine stitch the lining hem with a single-fold hem (fold 5/8 inch under and stitch close to the fold), or use a serger rolled hem for very fine woven fabric lining materials. A hand-rolled hem is optional but not necessary for most projects.
- Tack the lining at the side seams: Use a French tack — a small bar of thread about ½ to 1 inch long — to loosely connect the lining's side seam to the dress's side seam at the hem level. This keeps the two layers from separating during wear without restricting movement.
Lining a Sleeveless Dress vs. a Dress with Sleeves
The approach shifts depending on whether the dress has sleeves. Most sleeveless dresses are fully lined using the bag method described above. Dresses with sleeves present additional decisions.
Sleeveless Dresses
Sleeveless dresses are the easiest to line because both the neckline and armholes can be finished in a single operation using the bag lining method. No hand-finishing is needed at the armhole because the seam turns cleanly to the inside. This method works beautifully for structured woven fabric shells like cotton poplin, linen, or medium-weight crepe.
Dresses with Set-In Sleeves
When the dress has sleeves, you typically only line the bodice, not the sleeves themselves (unless the sleeves are also made from a very open woven fabric like lace or loose gauze). The lining bodice is attached at the neckline and waist seam, and its armhole edges are hand-stitched to the sleeve seam allowance after the sleeves are set in. This creates a clean, contained interior without adding restrictive bulk to the sleeve itself.
If you want lined sleeves — for example, in a winter dress made from a loosely woven fabric like bouclé — cut separate sleeve lining pieces in a smooth, lightweight woven fabric. Construct the sleeve lining, slip it inside the outer sleeve wrong sides together, baste the top edges together, and treat them as a single layer when setting the sleeve into the armhole.
Wrap Dresses and Surplice Necklines
Wrap dresses are typically self-lined or half-lined at the bodice. Cut a lining bodice that covers the area from the neckline to approximately 2 inches below the waist. Attach it at the neckline and front edges, then turn under the lower edge of the lining and topstitch or slip-stitch it in place. This stabilizes the front drape without adding weight or bulk to the skirt portion.
Partial Lining and Half-Lining Options
Not every dress needs to be fully lined from neckline to hem. Partial lining is a practical choice for warm-weather dresses, where full lining would be uncomfortably hot, or for very lightweight woven fabric shells where full lining would add unwanted body.
Bodice-Only Lining
Line only the bodice and leave the skirt unlined. This is ideal for dresses with a voluminous or gathered skirt made from a medium-weight woven fabric. The bodice lining handles the areas closest to the body, while the skirt swings and breathes freely. Finish the lower edge of the bodice lining by folding it under and edgestitching it to the waist seam.
Skirt-Only Lining
For a dress with an open or sheer skirt made from loosely woven fabric, line only the skirt and not the bodice. A slip-style lining cut to match the skirt shape provides coverage and prevents the outer woven fabric from clinging to legs. Attach the skirt lining at the waist seam before joining the bodice to the skirt.
The Hong Kong Finish as an Alternative
If you prefer to skip lining entirely, the Hong Kong finish is the most professional way to finish seam allowances in an unlined garment. Cut 1-inch-wide bias strips from a lightweight woven fabric and use them to encase each raw seam allowance separately. The result is a dress with beautifully finished seams visible from the inside — a hallmark of bespoke tailoring — without the weight of a full lining.
Common Lining Mistakes and How to Avoid Them
Even experienced sewists run into lining problems. The following mistakes account for the vast majority of issues that arise when lining a dress.
- Lining too short: If the lining was not cut 1 inch shorter than the hem, it may pull the outer hem upward when you walk. Rip out the lining hem and cut the lower edge shorter, then re-hem.
- Lining peeking at the neckline: This happens when the neckline seam was not rolled toward the lining after turning. Press the seam again, rolling it slightly inward, and understitch the seam allowances to the lining using a machine stitch placed close to the seamline. Understitching is the single most effective way to keep a neckline seam from rolling outward.
- Bubbling or puckering at the seams: Caused by mismatched grain lines between the outer woven fabric and the lining. Always double-check that grain lines are parallel before cutting lining pieces.
- Lining too tight across the back: Forgetting to add the back pleat or ease. The lining should never be tighter than the outer shell. If it is, let out the lining side seams by ¼ inch on each side.
- Visible stitching at zipper edge: Usually from trying to machine-stitch the lining to the zipper tape. Always hand-stitch this area with a blind stitch for an invisible finish.
- Lining and outer fabric hemmed together: Creates a restrictive tube. Always hem the two layers separately and use a French tack at the side seams to keep them loosely connected.
Tips for Lining Specific Dress Styles
Lining a Lace Dress
Lace is a loosely woven fabric (or lace-woven textile) with an open structure that requires careful handling during lining. Use a smooth, non-static woven fabric lining like polyester charmeuse or silk habotai to avoid snagging the lace. Cut the lining from a fitted, minimalist pattern if the lace overlay is already voluminous — the lining should fit close to the body and let the lace drape over it naturally. Stitch the lace to the lining only at the zipper seam and neckline, allowing the hem of the lace to hang freely over the lining hem.
Lining a Bias-Cut Dress
Bias-cut dresses are notoriously difficult to line because the outer woven fabric and the lining will each stretch and shift differently. The safest approach is to cut the lining on the bias as well, from a similarly lightweight woven fabric. Let both pieces hang separately for at least 24 hours after cutting to allow maximum stretch before assembly. Baste the two layers together at the waist and neckline, handling them as one unit from that point forward. Never press a bias seam with steam during assembly — steam activates stretch in bias-cut woven fabric and will cause the seam to distort.
Lining a Sheath or Pencil Dress
Fitted sheath dresses in structured woven fabric like suiting or dupioni benefit enormously from a Bemberg or rayon lining. The smooth lining surface allows the dress to glide over hosiery or leggings without bunching. Add a kick pleat or a walking slit extension to the back panel of the lining if the dress has one in the outer shell — otherwise the lining will tear at the back seam when you take a full stride.
Lining a Sundress or Casual Cotton Dress
For a relaxed summer dress in quilting cotton or chambray (a plain-woven fabric), a cotton batiste or lightweight cotton voile lining is the most comfortable choice. Both the outer woven fabric and the lining are natural fibers, so they breathe together and care requirements match. Machine wash and tumble dry both layers together without issue.
Tools That Make Lining Easier
The right tools reduce frustration significantly, especially when working with slippery woven fabric lining materials.
- Wonder clips (not pins): Pins can shift slippery woven fabric like charmeuse or habotai during stitching. Flat wonder clips hold the layers in place without distorting the fabric.
- Microtex or sharp machine needles: A size 70/10 or 80/12 Microtex needle creates clean, precise stitches in fine woven fabric without skipped stitches or puckering.
- Pressing ham: For curved seams at the neckline, a tailor's ham lets you press the seam over a curved surface so the final shape matches the body's curve, not a flat ironing board.
- Point turner: Useful for pushing out corners cleanly at neckline edges and armhole intersections after turning the bag-lined bodice right side out.
- Thread Heaven or beeswax: Run hand-stitching thread through beeswax before slip-stitching the lining to the zipper tape. The wax reduces tangling and lets the thread slide smoothly through multiple layers of woven fabric.
- Dress form: A dress form is not strictly required, but it makes checking hem length on the lining dramatically easier and more accurate than eyeballing it on a flat surface.
Frequently Asked Questions About Lining a Dress
Can I use the same fabric as the dress for lining?
Technically yes, but it is rarely a good idea. Self-lining (using the same woven fabric for both outer and lining) works for very lightweight fabrics like voile or lawn, where the doubled layer reaches an ideal opacity and weight. For most other woven fabric choices, self-lining adds too much bulk, particularly at seams, darts, and the hem. Use a dedicated lining fabric that is lighter in weight.
Does the lining need to match the dress color?
Not necessarily. For opaque outer fabrics, the lining color is hidden and it does not matter. For sheer or semi-sheer outer woven fabric, the lining color will show through, so it should either match closely or be a deliberate contrasting choice. Nude or skin-tone linings are a classic solution for sheer fabrics because they create the illusion of an unlined dress while still providing coverage.
How do I line a dress that already exists without a lining?
The process is the same in reverse. Use the finished dress as your pattern by laying it flat and tracing the shape of each panel onto paper. Add seam allowances, make the lining adjustments described above (shorten by 1 inch, add back pleat, etc.), and cut the lining from a suitable woven fabric. Construct the lining as a shell, slip it inside the dress, and hand-stitch the edges to the neckline, armholes, and zipper tape. The hem of the lining is left free and hemmed separately.
What is the difference between lining and underlining?
A lining is a separate inner garment attached only at specific seams (neckline, armholes, zipper). An underlining — also called a mounting — is a layer of fabric cut identically to the outer fabric piece and basted to the wrong side before construction, so both layers are sewn as one throughout the entire garment. Underlining adds body and prevents a loosely woven fabric from stretching, while lining provides a finished interior without necessarily altering the hand of the outer fabric.
Do I need to finish the seams of the lining?
If you are using a tightly woven fabric lining like polyester charmeuse or habotai, raw edges inside the lining are typically fine — they will not fray significantly. For loosely woven fabric lining materials or cotton/rayon linings that ravel, serge or pink the seam allowances before assembly. The goal is that the interior of the finished dress looks neat and will not deteriorate with repeated wear and washing.
 PREV
PREV